
Alerta - Overview
Alerta is an open-source alert management and monitoring system that consolidates, correlates, and deduplicates alerts from multiple monitoring tools and makes them available through a centralized dashboard and REST API. The AlertOps integration connects Alerta alerts to AlertOps, enabling automated incident creation, escalations, and notifications to the appropriate on-call responders through SMS, voice calls, push notifications, and email.
Prerequisites
📌 Before You Begin
- An active AlertOps account with Owner, App Admin, or Integrations Admin permissions to create and configure inbound API integrations.
- Access to an Alerta instance with administrative permissions to install and configure the AlertOps plugin, which forwards Alerta alerts to AlertOps.
- The AlertOps inbound integration endpoint URL, generated when creating the Alerta integration in AlertOps, and network connectivity from Alerta to that endpoint.
Configuration Steps
Part A: In AlertOps - Generate the Inbound Webhook URL
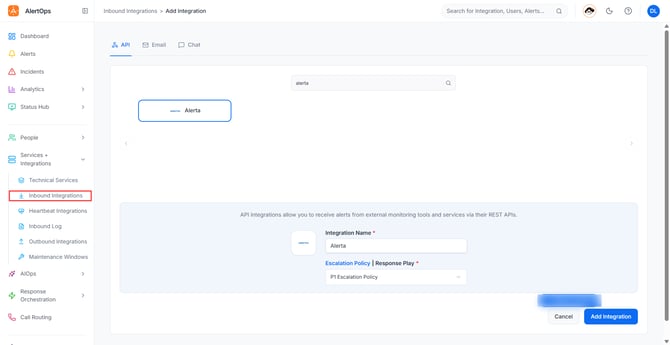
- In AlertOps, navigate to Services+Integrations → Inbound Integrations.
- Use the search bar to search for Alerta and select the integration template.
- Enter an integration name, then click Add Integration.
- Select an Escalation Rule to determine the escalation policy for incoming alerts.
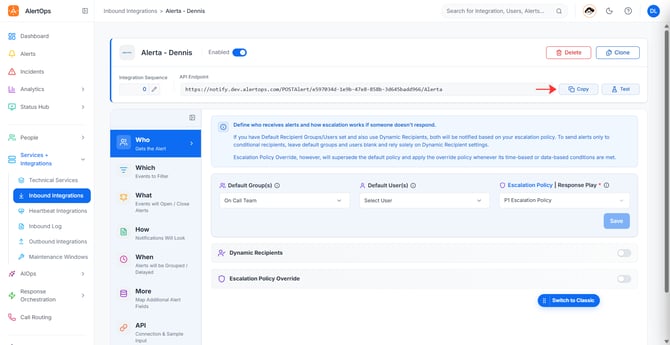
- In the Who section, enter the names of the recipient group(s) and recipient user(s) who should receive the alerts.
- Click Save.
- Click Copy URL at the top of the integration form to copy the unique inbound webhook URL. You will need this URL when configuring Alerta.
Keep this URL available for the next part of the setup. It is the endpoint to which Alerta sends alert notifications.
Part B: In Alerta — Configure Alerta to Send Alerts to AlertOps
Alerta uses an AlertOps plugin to forward alerts automatically. The plugin sends a JSON payload to the AlertOps webhook when an alert is received or acknowledged/assigned, subject to the plugin's event-handling logic.
Step 1: Install the AlertOps plugin
- Access the server or environment where Alerta is installed.
- Install the AlertOps plugin using the installation instructions in the AlertOps plugin repository.
The repository documents installation using the plugin's source repository and Python package installation. If Alerta runs in a Python virtual environment, install the plugin into that same environment.
Step 2: Configure the plugin
- Open Alerta's server configuration file, typically
alertad.conf. - Add
alertopsto the existingPLUGINSlist. Preserve any other plugins already enabled. - Set
ALERTOPS_URLto the inbound webhook URL copied from AlertOps. - Set
DASHBOARD_URLto the base URL of your Alerta web interface, so AlertOps notifications can link back to the corresponding Alerta alert.
Example configuration:
PLUGINS = ['reject', 'alertops']ALERTOPS_URL = 'https://your-alertops-webhook-url'DASHBOARD_URL = 'https://your-alerta-dashboard-url'Replace both example URLs with your actual URLs. If your PLUGINS list already contains other plugins, retain them rather than replacing the list with this example. The configuration keys and plugin behavior are documented in the AlertOps plugin README.
Step 3: Restart Alerta and verify the configuration
- Save the configuration changes.
- Restart the Alerta server using the service-management method applicable to your installation.
- Verify that Alerta starts successfully and that the
alertopsplugin loads without errors. - Confirm that the Alerta server can reach the AlertOps webhook endpoint.

Key Data Fields Required for Mapping
| AlertOps Alert Field | Alerta Source Field | Purpose and behaviour |
| Alert Source ID | source_id | Uniquely identifies the Alerta alert for deduplication and correlation of repeated alerts. |
| Source Status | source_status | Determines whether to open or close the corresponding AlertOps alert. |
| Source URL | source_url | Links to the alert in the Alerta dashboard. |
| Subject | <details^event> | Identifies the event that triggered the alert. |
| Email / Push Notification SMS/Voice Notification |
<description> | Provides the alert summary in responder notifications. |
JSON Payload to Use Inside AlertOps Integration
The AlertOps plugin generates the JSON payload automatically; you do not need to create a separate webhook payload manually in Alerta. The following example reflects the actual payload structure used by the plugin
{
  "source_id": "b88b8888-b88b-8b88-b88b-88888bb88bb8",
  "source_status": "open",
  "description": "Production: Critical alert for Website - WEB12345",
  "resource": "WEB12345",
  "source": "alerta",
  "source_url": "https://your-alerta-dashboard-url/#/alert/b88b8888-b88b-8b88-b88b-88888bb88bb8",
  "details": {
    "id": "b88b8888-b88b-8b88-b88b-88888bb88bb8",
    "resource": "WEB12345",
    "event": "ServerDown",
    "environment": "Production",
    "severity": "critical",
    "status": "open",
    "service": ["Website"],
    "group": "Misc",
    "text": "Website server is down",
    "origin": "alertad/server123",
    "type": "exceptionAlert",
    "createTime": "2019-09-30T17:52:34.902Z",
    "duplicateCount": 0,
    "repeat": false
  }
}
How to Test the Integration
- In Alerta, generate a test alert with a critical severity, such as a simulated
ServerDownevent. - In AlertOps, In AlertOps, navigate to Services+Integrations → Inbound Log.
- Locate the incoming Alerta message and inspect the received payload.
- Verify that the message is successfully mapped and that an AlertOps incident is created and routed according to the configured escalation rule and recipients.
- To test resolution, update the corresponding Alerta alert to a severity of
normal,ok, orcleared, as appropriate for your setup. - Confirm that AlertOps receives the closing event and closes the corresponding incident.
Troubleshooting tip: If the message appears in the Inbound Log but no incident is created, inspect the mapping status and payload. A successfully received message does not necessarily mean an incident was created. You can refer to this article: Inbound Log - Mapping Status.