
Cloudfare- Overview
Cloudflare is a global connectivity cloud platform that provides content delivery, DNS, DDoS protection, web application firewall (WAF), and load balancing services, and generates real-time notifications for events such as health check failures, origin errors, DDoS attacks, and SSL certificate issues. The AlertOps integration connects Cloudflare notifications to AlertOps via webhook, enabling automated incident creation, escalations, and notifications to the appropriate on-call responders through SMS, voice calls, push notifications, and email.
Prerequisites
📌 Before You Begin
-
- An active AlertOps account with Owner, App Admin, or Integrations Admin permissions to create and configure inbound API integrations.
- Access to an Cloudfare instance with administrative permissions to install and configure the AlertOps plugin, which forwards Cloudfare alerts to AlertOps.
- The AlertOps inbound integration endpoint URL, generated when creating the Cloudfare integration in AlertOps, and network connectivity from Cloudfare to that endpoint.
Configuration Steps
Part A: In AlertOps - Generate the Inbound Webhook URL
-
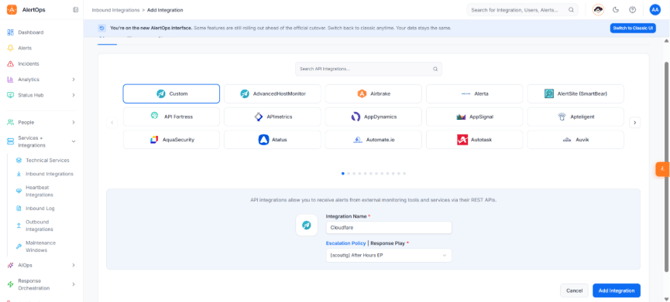
- In AlertOps, navigate to Services+Integrations → Inbound Integrations.
- Use the search bar to search for Cloudfare and select the integration template.
- Enter an integration name, then click Add Integration.
- Select an Escalation Rule to determine the escalation policy for incoming alerts.
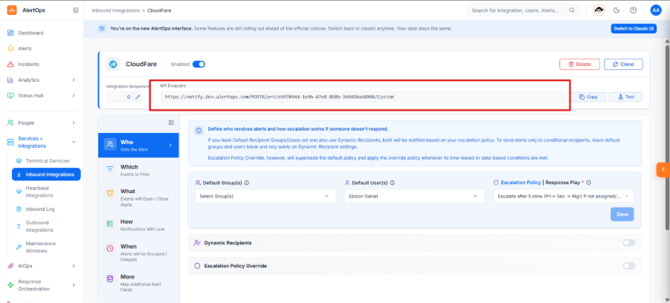
- In the Who section, enter the names of the recipient group(s) and recipient user(s) who should receive the alerts.
- Click Save.
- Click Copy URL at the top of the integration form to copy the unique inbound webhook URL. You will need this URL when configuring Cloudfare.
Keep this URL available for the next part of the setup. It is the endpoint to which Cloudfare sends alert notifications.
Part B: In Cloudfare — Configure Cloudfare to Send Alerts to AlertOps
Cloudflare sends alerts to AlertOps through its Notifications feature. You first create a generic webhook destination that points to the AlertOps inbound integration URL, and then attach that destination to one or more notification policies. When an event matching a policy occurs (for example, a health check failure, origin error, or DDoS attack), Cloudflare sends a JSON payload to AlertOps, which creates an alert and routes it according to your escalation policy. When the condition clears (for example, a health check returns to healthy), AlertOps automatically closes the same alert.
Prerequisites
- A Cloudflare account on a paid plan. Webhook delivery is not available on accounts that only have Free zones; those accounts can use email notifications only.
- A Cloudflare user with permission to manage notifications for the account.
- The inbound integration URL copied from AlertOps (Part A).
Step 1: Create a webhook destination
- Log in to the Cloudflare dashboard and select your account.
- Go to Notifications > Destinations.
- In the Webhooks card, select Create.
- Enter a Name for the webhook (for example, AlertOps).
- In the URL field, paste the AlertOps inbound integration URL.
- (Optional) Enter a Secret. Cloudflare includes this value in the cf-webhook-auth header of every request.
- Select Save and Test.
Step 2: Attach the webhook to a notification policy
- Go to Notifications > All Notifications and select Add.
- Locate the product or alert type you want to forward to AlertOps (for example, Health Checks, Origin Monitoring, or HTTP DDoS Attack Alerter) and choose Select.
- Enter a Name and optional Description for the notification.
- Complete any fields required for that alert type, such as the zones, health checks, or pools to monitor.
- Under Webhooks, select the AlertOps webhook you created in Step 1.
- Select Save.
Repeat this step for each alert type you want to send to AlertOps. Multiple notification policies can use the same AlertOps webhook.If the notification form shows only email fields and no webhook selector, webhook delivery is not available for that notification on your account plan.
Step 3: Verify the integration
-
- In AlertOps, confirm that the test message from Step 1 created an alert. You can view the raw payload in the Inbound Log for the Cloudflare integration. Close the test alert once verified.
- Trigger a real event if possible (for example, temporarily point a test health check at an unreachable endpoint) and confirm that an alert is created and routed to the correct escalation policy and recipients. Then restore the endpoint and confirm that AlertOps automatically closes the alert once the health check returns to healthy.
- Review the incoming payload in the Inbound Log and adjust the integration's field mappings in AlertOps if needed.
- In Cloudfare, generate a test alert with a critical severity, such as a simulated ServerDown event.
- In AlertOps, In AlertOps, navigate to Services+Integrations → Inbound Log.
- Locate the incoming Cloudfare message and inspect the received payload.
- Verify that the message is successfully mapped and that an AlertOps incident is created and routed according to the configured escalation rule and recipients.
- To test resolution, update the corresponding Cloudfare alert to a severity of normal, ok, or cleared, as appropriate for your setup.
- Confirm that AlertOps receives the closing event and closes the corresponding incident.
The Cloudflare steps are based on Cloudflare's Configure webhooks documentation.
Key Data Fields Required for Mapping
AlertOps Alert Field
Cloudfare Source Field
Purpose and behaviour
Alert Source ID
source_id
Uniquely identifies the Cloudfare alert for deduplication and correlation of repeated alerts.
Source Status
source_status
Determines whether to open or close the corresponding AlertOps alert.
Source URL
source_url
Links to the alert in the Cloudfare dashboard.
Subject
<details^event>
Identifies the event that triggered the alert.
Email / Push Notification
SMS/Voice Notification<description>
Provides the alert summary in responder notifications.
JSON Payload to Use Inside AlertOps Integration
The AlertOps plugin generates the JSON payload automatically; you do not need to create a separate webhook payload manually in Cloudfare. The following example reflects the actual payload structure used by the plugin
{"name": "string",
"text": "string",
"data": {},
"ts": 1136214245,
"account_id": "string",
"policy_id": "string",
"policy_name": "string",
"alert_type": "string",
"alert_correlation_id": "string",
"alert_event": "string"
}
How to Test the Integration
- In Cloudfare, generate a test alert with a critical severity, such as a simulated ServerDown event.
- In AlertOps, In AlertOps, navigate to Services+Integrations → Inbound Log.
- Locate the incoming Cloudfare message and inspect the received payload.
- Verify that the message is successfully mapped and that an AlertOps incident is created and routed according to the configured escalation rule and recipients.
- To test resolution, update the corresponding Cloudfare alert to a severity of normal, ok, or cleared, as appropriate for your setup.
- Confirm that AlertOps receives the closing event and closes the corresponding incident.
Troubleshooting tip: If the message appears in the Inbound Log but no incident is created, inspect the mapping status and payload. A successfully received message does not necessarily mean an incident was created. You can refer to this article: Inbound Log - Mapping Status.