Set Up Call Routing
In this section, we will review all the features included in the Call Routing Detail screen.
To access call routing, click Configurations on the menu bar and select Call Routing. Select the phone number/line you'd like to configure within your environment.
To block unwanted calls, send a list of unwanted caller numbers to Support@AlertOps.com.
-png.png?width=596&height=387&name=image-1675713509596(1)-png.png)
- Enter an Incoming Call Routing Description to name your Call Routing number. This will be used as the Source for Alerts generated by calls.
- Check Enabled to enable this line. Uncheck to disable.
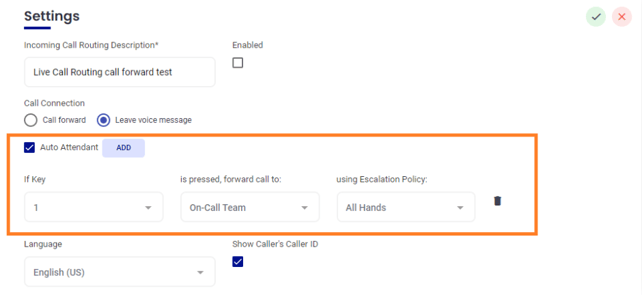
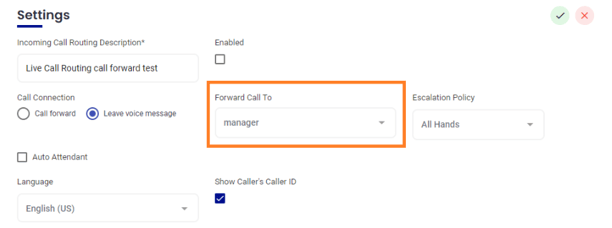
- For Call Connection, toggle between Call Forward or Leave Voice Message.
- Check Auto Attendant to enable callers to navigate between teams using a digit/key. Use Routing Key Assignment to assign a unique digit/key for each Team/Group.
- Or, if you are not using Auto Attendant, next to Forward Call To, select a Group for the calls to be forwarded to.
Call Forwa - Select an Escalation Policy or Response Plays for Unanswered calls
- Escalation Policies and Response Plays are only used once the call has been missed and moves to an automated escalation. Escalation Policies and Response Plays are not leveraged for the live-call connection.
-
Call forwarding to a group works by routing calls to on-call technicians in order within schedule, based on the phone numbers configured in their user profiles. A few important things to note:
- Primary and Secondary members are the only ones included in the call routing sequence — the Manager role is excluded from this.
- Managers are only involved at the alert level — meaning they're notified through the escalation policy on any alert created as a result of those calls, not through the call routing itself.
Want to include a manager in the call routing sequence?
Create a separate group with the manager added as a Primary or Secondary member, then nest that group under the main group where your call routing is configured. This gives you full control over the routing order while keeping the structure clean.For further assistance with this setup, feel free to reach out to our support team.
- Select a preferred Language from the drop-down menu. This will cause the message to be read in the chosen language. Note, for best results, type the message in the chosen language, to avoid any translation issues.
- Check Show Caller ID to see a caller ID when receiving a call. Uncheck to disable Caller ID. When disabled, the Routing Number will be displayed in the Caller ID, allowing for easy identification by team members.
- Under Welcome Message enter a customized greeting to play for the caller. Or, upload a Custom Recording (MPEG, wav, or aif format) to play a pre-recorded welcome message for the caller.
- Enter a Recording Message or upload a Custom Recording to prompt the caller to leave a message.
- Click the green checkmark to save changes.
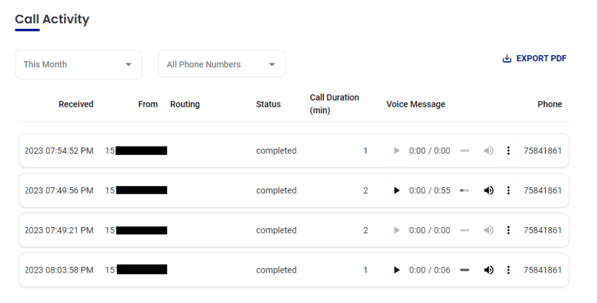
View Call Activity
- Click Configurations on the menu bar and select Call Routing.
- Scroll down to the Call Activity Section to view call activity by date by selecting dates using the dropdown menus.
Each attempted transfer is recorded, and time-stamped. Any voicemail can be played from this screen.