Overview
- Purpose: Explain how Scheduling works in AlertOps and provide the steps to create and manage Shifts for a Group.
- Audience: AlertOps Owner, App Admin, Group Admin, and any other custom role with appropriate entitlements responsible for on-call coverage.
- Prerequisites:
- Out of scope (see related articles):
- Detailed scheduling + notification use cases.
- Overrides, Out of Office, and Export.
- Outcome: You can create, edit, and remove shifts using templates or the Custom configuration tab, and set schedule reminders.
Feature Explanation
How Scheduling fits with Groups
AlertOps Groups and Schedules are designed to answer two operational questions consistently:
- Who should be notified?
- When should they be notified?
A Group’s Schedule is made up of configurable Shifts that define which members are “on duty” during specific times.
Key concepts (what you configure)
- Schedule: The overall on-call coverage view for a Group (shown in timeline or calendar format).
- Shift: A specific coverage rule inside the schedule (who is on duty and when).
- Shift templates: Predefined patterns for common coverage setups (recommended starting point).
- Custom Shift: A fully configurable shift definition used when templates don’t match your requirements.
Shift template catalog (what each template is for)
Use the following templates when adding a shift (names/intent aligned to your provided list and the Scheduling UI template selection screen).
|
Category |
Template |
Intended coverage |
|
Rotating |
Rotating – Weekdays After-Hours |
Selected team members rotate after business hours on weekdays |
|
Rotating |
Rotating – Weekends |
Selected team members rotate from Friday evening to Monday morning |
|
Rotating |
Rotating – Business Hours |
Selected team members rotate during business hours on weekdays |
|
Fixed with all users |
Fixed With All Users – Weekdays After-Hours |
All team members cover weekday after-hours without rotation |
|
Fixed with all users |
Fixed With All Users – Weekends |
All team members cover Friday evening → Monday morning without rotation |
|
Fixed with all users |
Fixed With All Users – Business Hours |
All team members cover weekday business hours without rotation |
|
Fixed with selected users |
Fixed With Selected Users – Weekdays After-Hours |
Selected team members cover weekday after-hours without rotation |
|
Fixed with selected users |
Fixed With Selected Users – Weekends |
Selected team members cover Friday evening → Monday morning without rotation |
|
Fixed with selected users |
Fixed With Selected Users – Business Hours |
Selected team members cover weekday business hours without rotation |
|
Others |
Repeating |
Rotating shifts that reset after a set number of weeks |
|
Others |
Custom |
Create a shift that is specific to your requirements |
Fixed vs Rotating
- Fixed shifts keep the same on-duty assignment during the shift period; roles do not rotate.
- Rotating shifts rotate roles between members over time (based on rotation settings you define).
Continuous vs Block
When configuring a shift (especially via Custom), you typically select one shift type:
- Continuous: Coverage is uninterrupted during the defined window (often used for broad “weekend coverage” windows).
- Block: Coverage is constrained to specific day/time blocks (useful when coverage is not continuous across the selected range).
Notification order and Rotation order
- Notification order: When a shift has multiple members on call, users are notified in the order shown (top to bottom) for the applicable role (Primary, Secondary or Manager).
- Rotation order (rotating shifts): Rotation moves the top user to the bottom, while the original second from top user now becomes the top user; users assume the role held by the previous person in the rotation.
Note: Rotating members who are not currently active in the rotation are not notified until they rotate into an active role/time slot.
Configuration Guide
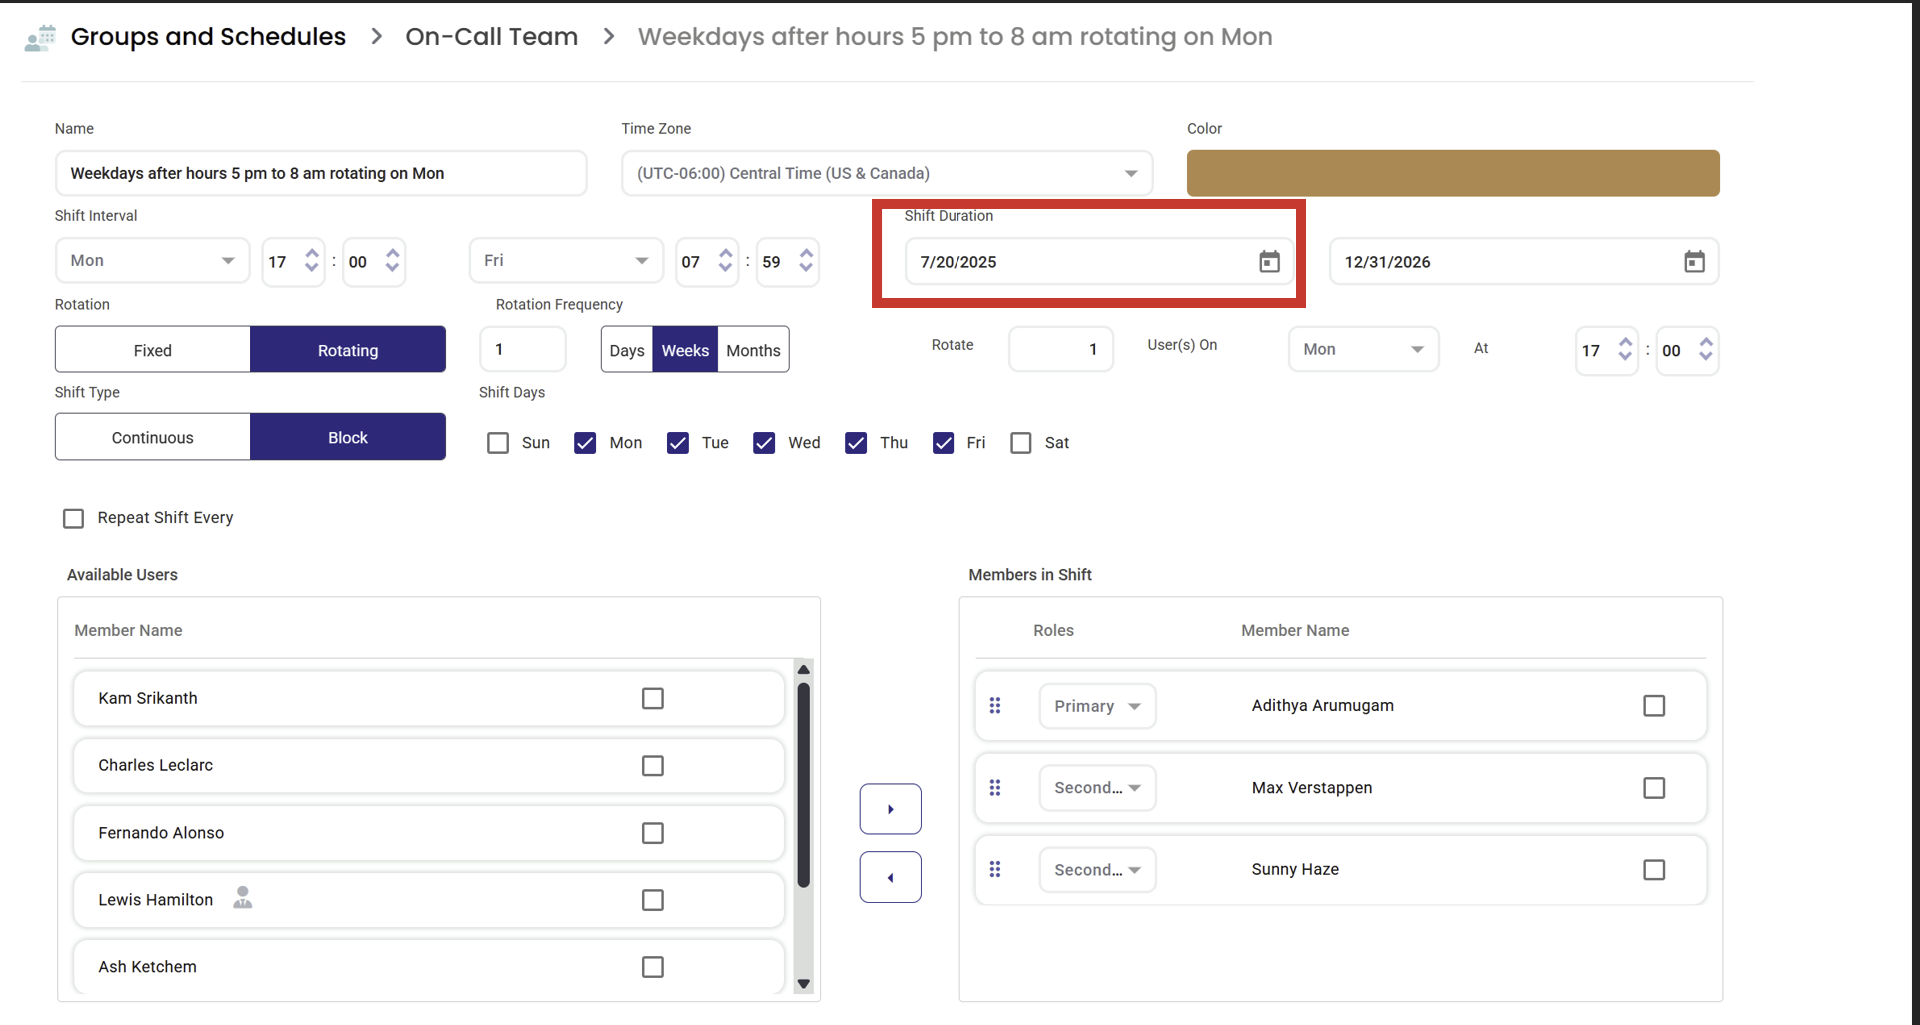
Create a shift using the Custom tab (full control)
Note: Read this section to understand the configurations possible within a schedule to better understand how templated Schedules behave and how to edit them to your exact requirements.
Use Custom when you need a shift pattern not covered by templates, or when you want to explicitly control rotation, days, and membership in one place.
- Go to Configuration → Groups & Schedules.
- Open the target Group → open the Schedule
- Click Add Shift.
- Select Custom.
- Configure the fields (recommended order):
- Enter a Name for the shift.
- Select the Time Zone the shift should use.
- Select a Color to identify the shift in the schedule views.
- Set Shift Interval (start day/time and end day/time).
- Set Shift Duration (start date and end date).
- Choose Rotation:
- Fixed (no role rotation), or
- Rotating (roles rotate based on frequency).
- If Rotating, set:
- Rotation Frequency (Days / Weeks / Months)
- Rotate (how many users rotate each cycle)
- User(s) On (the day rotation occurs)
- At (the time rotation occurs)
- Choose Shift Type:
- Continuous or Block.
- Select Shift Days (Sun to Sat) when the shift is active.
- Add users under Members in Shift:
- Select users from Available Users.
- Use the arrow controls to move them into Members in Shift.
- Arrange users in the intended order to match notification/rotation expectations.
- (Optional) Enable Repeat Shift Every if you want a shift to reset and repeat automatically at a defined interval.
- Click Submit.
Expected Result
- The Custom shift displays in the Group schedule with the configured color and coverage window.
How to Verify
- Open the Group’s Schedule
- Toggle Timeline / Calendar and confirm:
- Coverage appears on the expected days/times
- Members appear in the shift as expected
- For rotating shifts, the rotation boundary aligns to the configured “rotate on” day/time
Troubleshooting
- Rotation doesn’t appear to change who is on duty: Confirm the shift is configured as Rotating, has valid start/end dates, and has a rotation frequency set (Days/Weeks/Months).
- Users not getting notified in the expected order: Confirm member ordering in Members in Shift; notification order follows the defined sequence under Escalation Policies.
- Can’t remove a user from the Group: Users assigned in a Group schedule often must be removed from shifts first before removal from the Group succeeds.
Create a Shift using a Template
- Go to Configuration → Groups & Schedules.
- Open the target Group.
- Open the Schedule
- Click Add Shift.
- Select a Shift Template (for example: Rotating – Business Hours or Fixed With All Users – Weekends).
- Complete the required fields in the shift dialog (the template determines which options appear).
- Click Submit.
Expected Result
- The shift appears in the Group’s schedule and is visible in timeline and calendar
How to Verify
- In the Schedule tab, toggle between Timeline and Calendar.
- Confirm the shift is displayed for the expected dates/times.
Troubleshooting
- Shift displays but coverage looks wrong: Re-check time zone, shift interval, and assigned members in shift (see Custom field guidance below).
Edit a shift (change membership, times, or rotation)
- Open the target Group → Schedule
- Open the shift’s menu (three-dot menu next to the shift).
- Select Edit Shift.
- Update the fields (membership, time zone, interval, rotation settings, etc.).
- Click Submit.
Expected Result
- The schedule refreshes and reflects the updated shift rules.
How to Verify
- Confirm the updated coverage window and membership display correctly in Timeline/Calendar.
Remove Users from a Shift
- In the Schedule tab, open the shift’s menu → select Edit Shift.
- Scroll to Members in Shift.
- Select the user(s) to remove.
- Move them back to Available Users.
- Click Submit.
Expected Result
- The user no longer appears in Members in Shift and is no longer considered on duty for that shift.
How to Verify
- Refresh the schedule view and confirm the user is not listed under the shift.
Troubleshooting
- You still can’t remove the user from the Group: Ensure the user is removed from all shifts in that Group schedule.
Delete a shift
- Open the target Group → Schedule
- Open the shift’s menu (three-dot menu next to the shift).
- Click Delete Shift.
- Confirm deletion.
Expected Result
- The shift no longer appears in the schedule.
How to Verify
- Refresh the Schedule tab and confirm the shift is gone.
Email Schedule
Schedule reminders help ensure the right people know when they are scheduled to be on call.
On Call Schedule Notification Reminders
To get yourself notified before your shift begins:
- Navigate to your User Profile from the top right “Hi <your_name>” button.
- Scroll down to the On Call Reminder section to configure your personal notification reminder flow.
- Select your preferred channel: E-Mail Reminders or Push Notifications via the AlertOps mobile app.
Best Practices
Shift Changes, Sequence Changes, Order Disruption
When a shift is modified, AlertOps reorders it based on the shift's Start Date. The display order in the schedule configuration reflects that date and rotates accordingly — meaning any edit that affects the start date can inadvertently change the sequence of your on-call rotation.
To avoid this, always use Clone Shift before making any edits. Make your changes on the clone, verify the order looks correct, and then use the clone in place of the original. This keeps the original intact as a backup in case the sequence gets disrupted during editing.
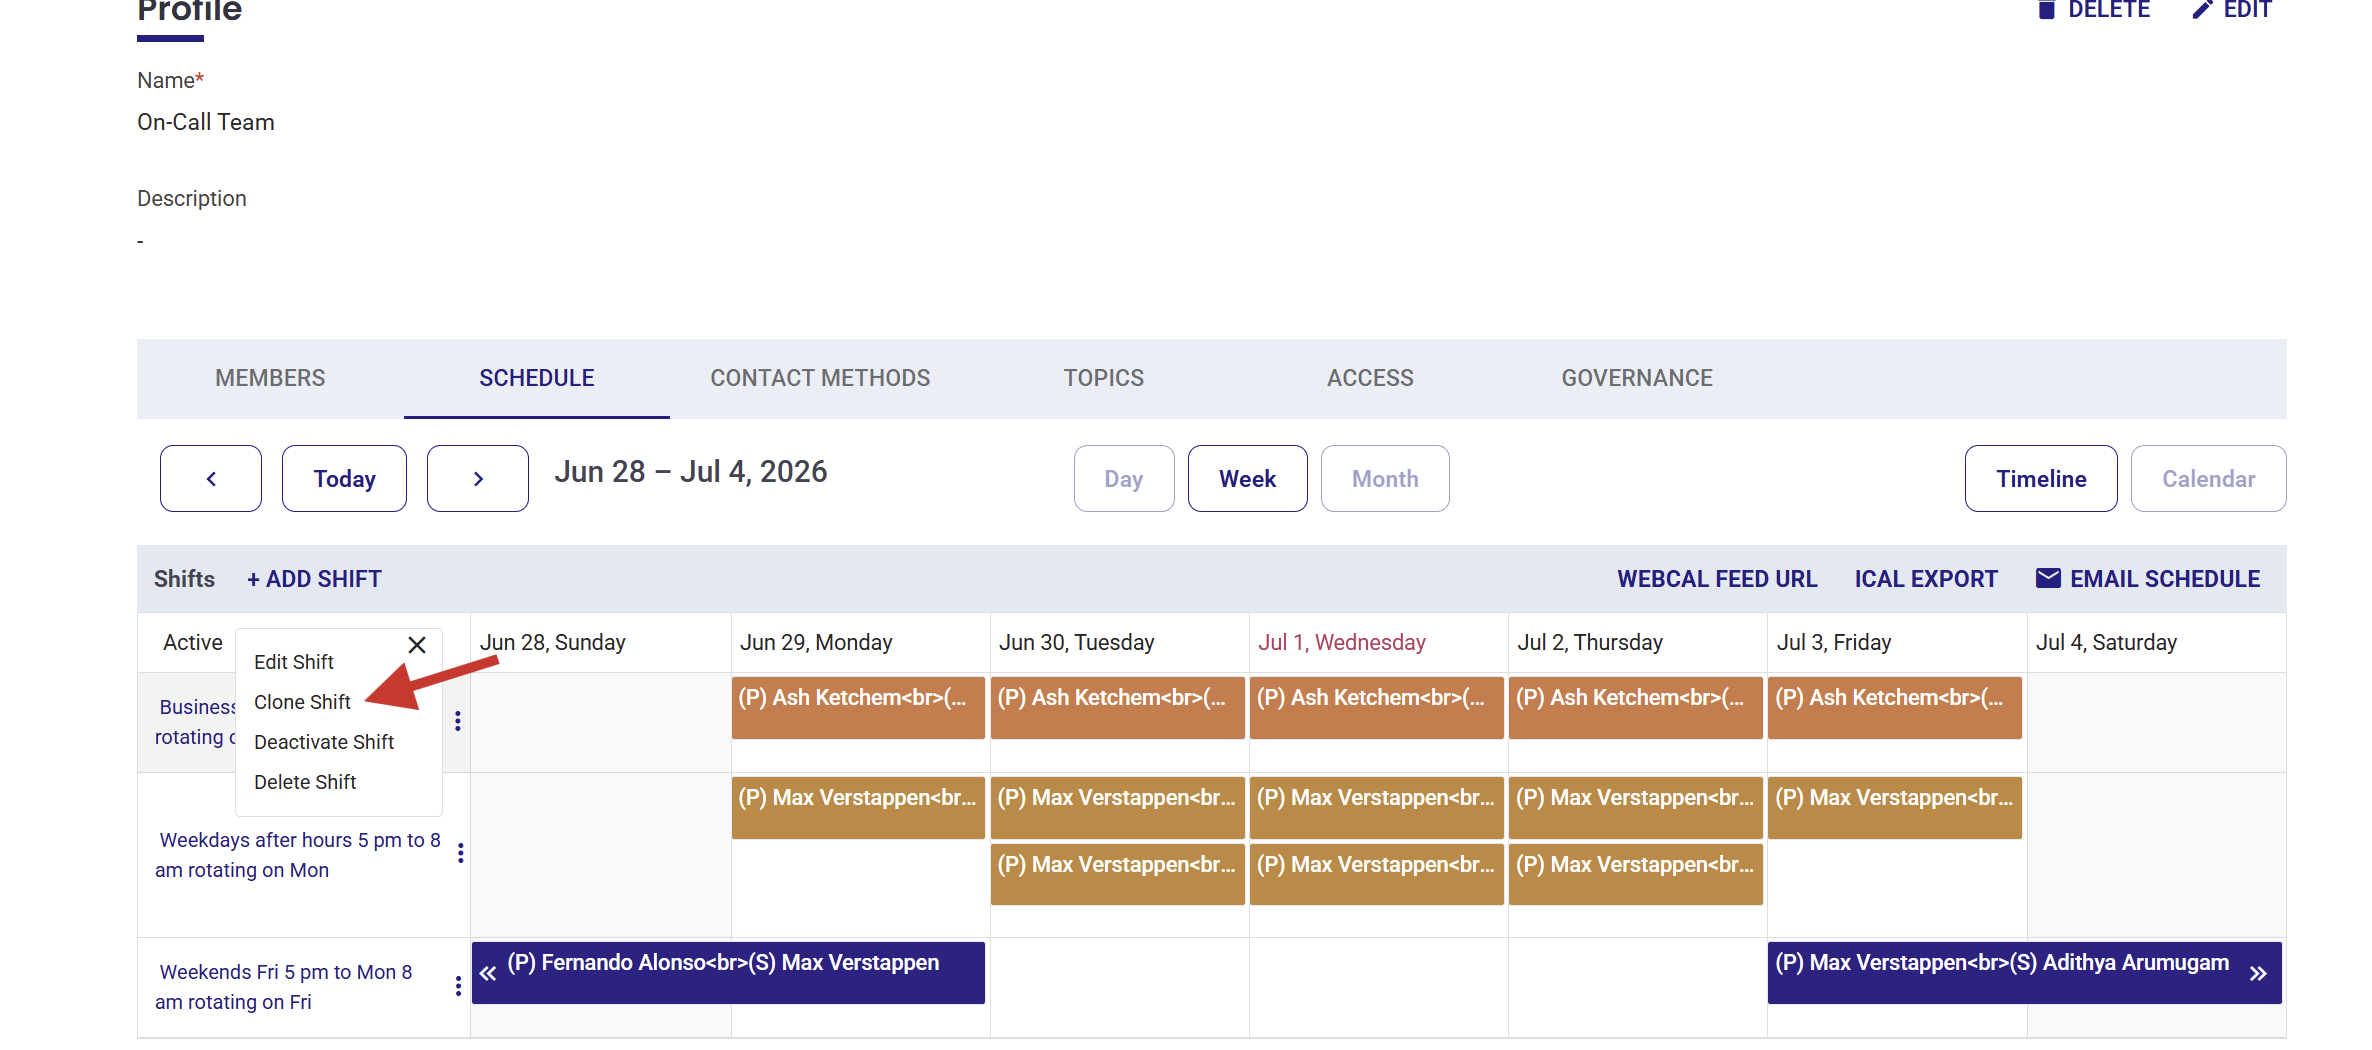
Rotation order directly determines who gets paged and when — an unintended reorder can silently route alerts to the wrong person, so this step is worth building into your standard process any time a shift needs to be changed.
Do
- Use Shift Templates for standard weekday/weekend/business-hours coverage and reserve Custom for truly unique patterns.
- Keep Group naming and membership stable, and adjust coverage by modifying shifts rather than constantly restructuring Groups.
- For rotating shifts, set clear start/end dates and review the rotation periodically (common operational cadence: quarterly or semi-annually).
- Use distinct shift colors to visually separate coverage blocks in Calendar
Don’t
- Don’t treat schedules to be indefinitely “set-and-forget”; rotation membership and escalations should be reviewed quarterly per best practice to ensure no scheduling expiration.
- Don’t remove users from a Group before removing them from that Group’s schedule assignments (this often blocks deletion/removal operations).
Related Concepts
- Groups - Overview (Concepts and Core Components)
- Groups - Operations (Create, Update, Delete, Members, Roles, Schedules, Contact Methods, Topics)
- Notifications and Scheduling: Detailed Use Cases
- Schedule Exceptions: Overrides, Out of Office, and Export