
Purpose
A schedule decides which member of a group is on-call at any given moment. It is made up of one or more shifts, each of which defines a time window, the members covering it, and the roles (Primary / Secondary / Manager) those members hold during the shift. This article covers the full shift-creation flow, the difference between Fixed and Rotating shifts, and how notifications actually order members during an alert.
Audience
Relevant for App Admins and Group Managers
Creating and editing shifts is an admin action. An in-group Manager can edit shifts on groups they manage; App Admins can edit any group's shifts.
Prerequisites
- A group with at least one member. See Group Management.
- App Admin platform role or Manager role on the target group.
- Familiarity with Time Zones — each shift picks its own Time Zone independent of Account and User.
What Is a Schedule?
A schedule is a collection of configurable shifts attached to a group. Each shift tells AlertOps "during these hours on these days, these members are on-call, in this role order."
|
Groups without shifts When a group has no shifts configured (other than the default 24x7 shift that ships with every new group), escalations fall back to the static member roles on the group's Members tab plus the order the members are listed in. Add shifts to represent rotations and time-based coverage. |
|
The Schedule tab is greyed out on a new group until you add members A freshly-created group's Schedule tab is disabled. Add at least one member on the Members tab first, and the Schedule tab becomes clickable. The default 24x7 shift is then visible and assigns every member Primary automatically — adjust roles on the shift if that is not what you want. |
Create a Shift
Relevant for App Admins and Group Managers
Step 1 — Open the group and go to the Schedule tab
- From the top nav, click Configuration → Groups and Schedules.
- Select the group you want to schedule.
- Click the Schedule tab on the group's detail page.
Step 2 — Pick a shift template
Click + Add Shift. AlertOps opens a template-picker page with four collapsible category bands — click a chevron to expand or collapse any band. Pick a template card to pre-fill the shift editor's fields so you have less to configure from scratch. Eleven cards are available across the four categories:
- Rotating — Weekdays After-Hours, Weekends, Business Hours. Roles cycle through members on a schedule.
- Fixed with all users — same three time windows as Rotating, but every user in the group covers the shift.
- Fixed with selected users — same three time windows, you pick which subset of the group covers the shift.
- Others — two cards: Repeating, and Custom. Custom exposes every field so you can build any pattern from scratch.
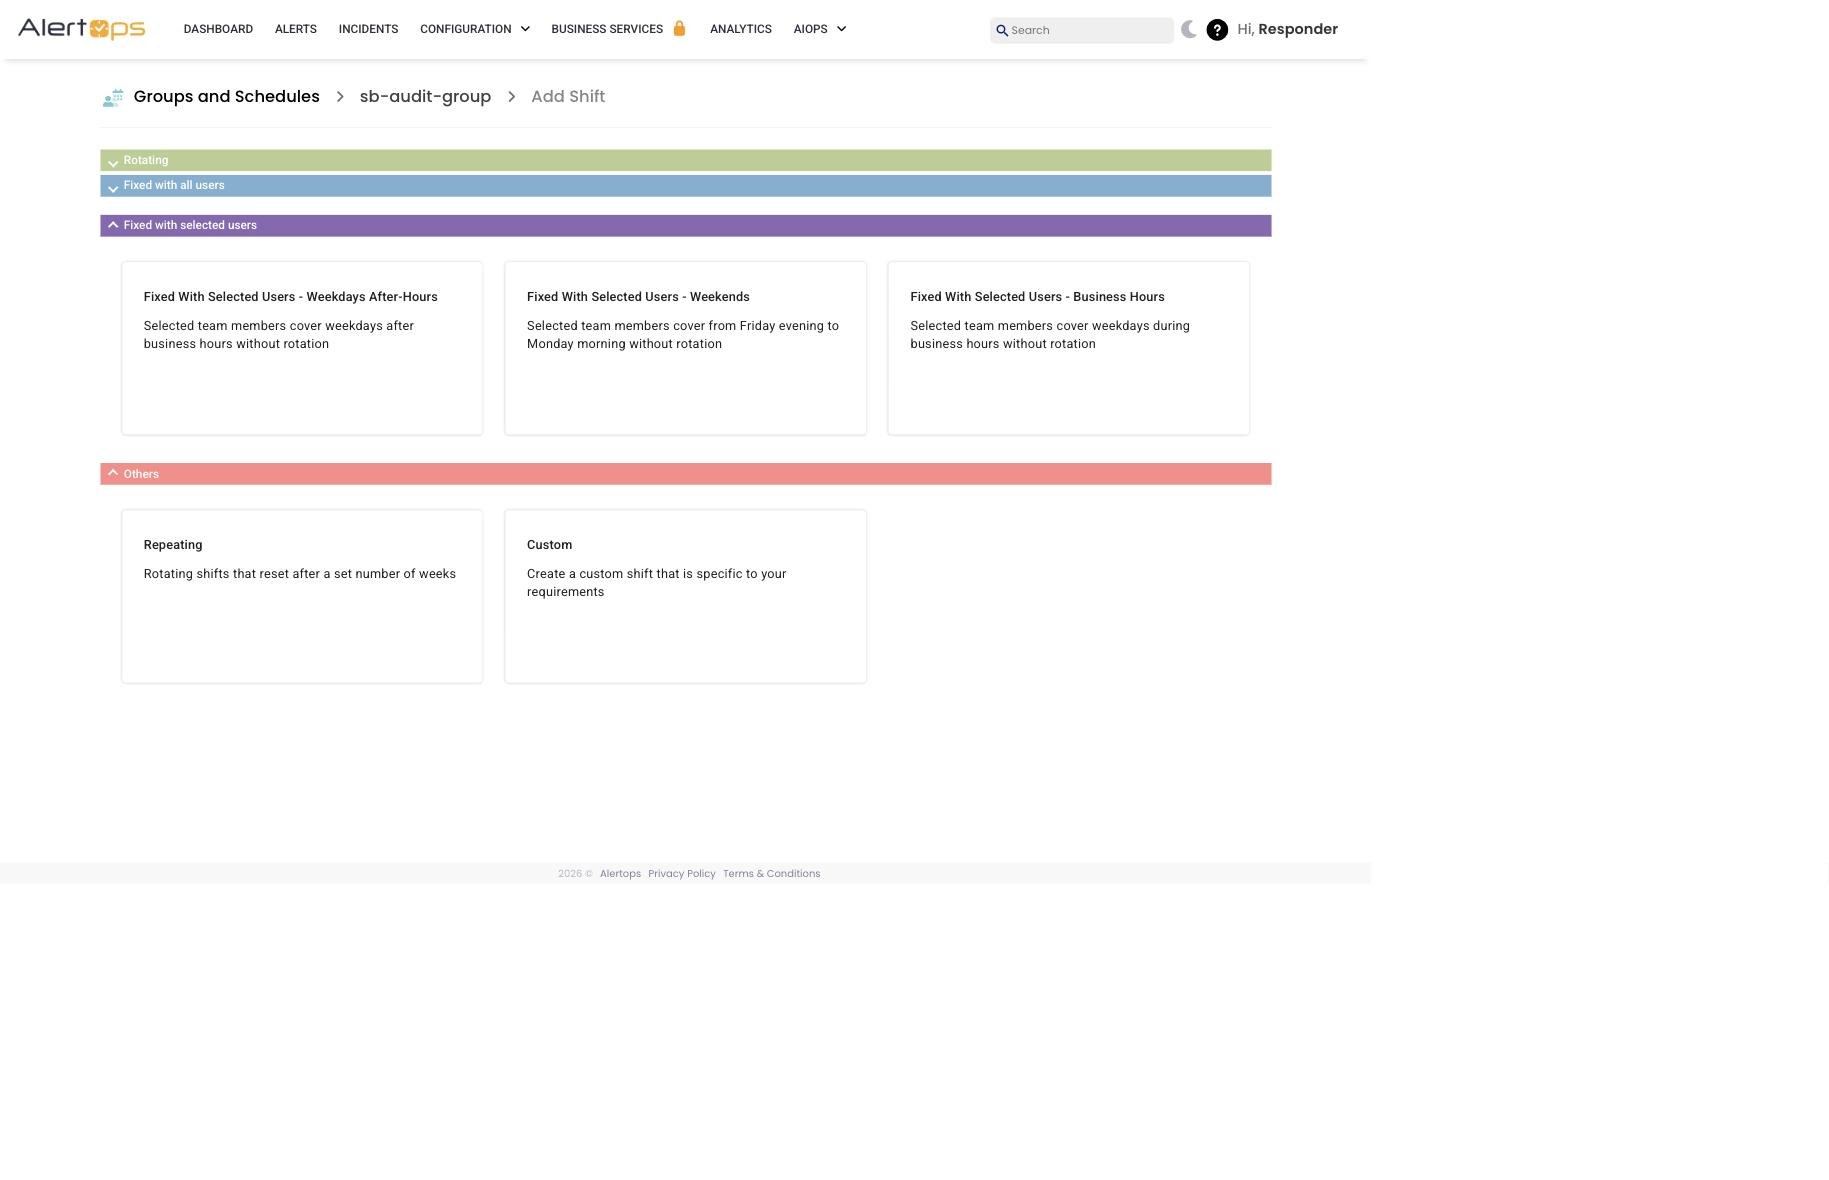
Figure 1. Shift template picker — four collapsible category bands, eleven cards total. Click any card to pre-fill the shift editor.
Step 3 — Fill in the shift editor
- Enter a clear Name that describes the coverage (for example, "Payments — Weekday Business Hours").
- Pick a Time Zone for the shift. The shift's hours will be interpreted in this zone.
- Choose a Color to represent the shift on the group calendar. Use contrasting colours so overlapping shifts are easy to distinguish.
- Set the Shift Interval — the start day/time and end day/time within a week (for example, Mon 08:00 → Fri 16:59).
- Set the Shift Duration. Fixed shifts can be perpetual — the No Start Date / No End Date radios are available. Rotating shifts require an explicit Start Date and End Date; the no-date options are hidden.
- Pick the Rotation type — Fixed (roles do not change) or Rotating (roles cycle through members at a Rotation Frequency).
- Pick the Shift Type — Continuous (one uninterrupted block) or Block (starts and ends on specific days of the week).
- Tick the Shift Days the shift should be in effect (Sun–Sat).
- Add members to the shift — see the Fixed and Rotating sections below for how each differs.
- On Rotating shifts (and Custom): optional Repeat Shift Every checkbox — reveals an interval input and "Week(s) Until [date]" picker so the shift auto-resets and repeats on a cadence. Not available on Fixed shifts.
- Click Submit. The shift appears on the group calendar.
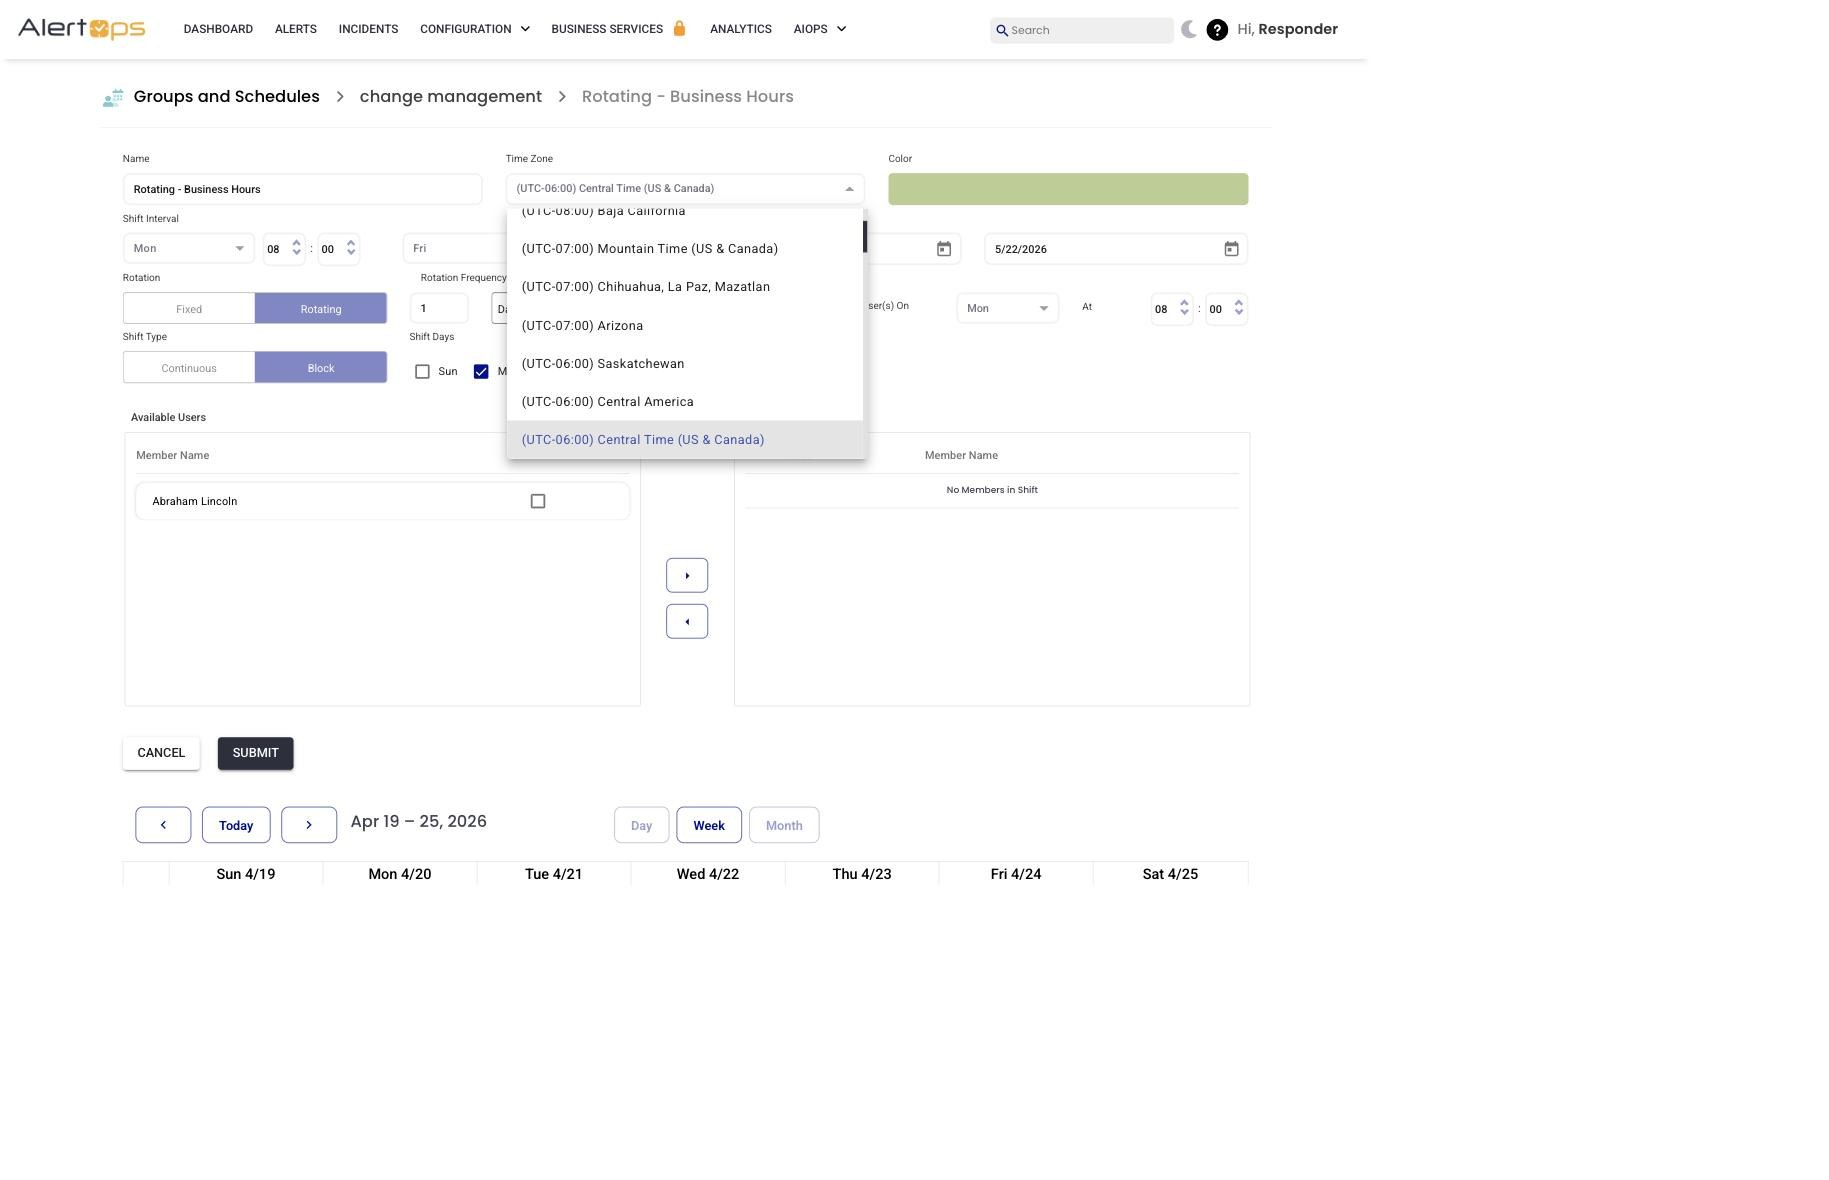
Figure 2. The shift editor — one screen captures all of the fields described above.
Fixed vs. Rotating Shifts
|
Dimension |
Fixed |
Rotating |
|
When roles change |
Never — the same members hold Primary / Secondary for the full shift period. |
On a schedule — members cycle through Primary / Secondary / Rotating at a configurable frequency. |
|
Roles used |
Primary and Secondary only. |
Primary, Secondary, and Rotating (standby, cycling in later). |
|
Duration options |
Perpetual (no end date) or a fixed window. |
Must have a Start and End date — six months to a year is typical. |
|
Member selection |
All Users In Group checkbox (every member) or explicit selection via the Available Users → Members in Shift dual list. |
Tick users in the Available Users list and click → to move them to Members in Shift. Reorder with the drag handle on each row. |
|
Use case |
Stable team where the same person is always primary. Set it and forget it. |
Rotation where responsibility moves across a team on a cadence (weekly, bi-weekly, monthly). |
Fixed shift — adding members
A Fixed shift uses only the Primary and Secondary roles — the per-member role dropdown shows exactly those two options. When the All Users In Group checkbox is ticked, every member of the group is added to the shift. Uncheck it to use the dual list and pick specific members.
On a Fixed shift, the Rotation Frequency / Rotate / User(s) On / At / Repeat Shift Every fields are all hidden — they are only relevant to Rotating shifts.
If more than one member holds the same role, the sequence on the Members list decides who is paged first. Example: if Ellen and Donald are both Primary and Ellen is listed above Donald, Ellen is paged first.
Rotating shift — adding members
A Rotating shift uses Primary, Secondary, and a non-active Rotating role. Members in the Rotating role are on standby — they are not paged during the current period but will rotate into active roles later.
- In the Available Users panel on the left, tick the checkbox next to each user you want on the shift.
- Click the → arrow to move them to Members in Shift on the right. Use ← to remove.
- Order the Members in Shift list — the top member will be Primary at the start of the rotation, the next will be Secondary, and remaining members go into the Rotating standby queue.
- Set a role on each member row using the per-member dropdown (Primary / Secondary / Rotating).
- Set the Rotation Frequency (how many group members rotate each cycle, and how often).
|
Rotation mechanics When the rotation advances, the user at the top of the list moves to the bottom and assumes a Rotating (standby) role. The previous Secondary becomes the new Primary. The first Rotating user becomes the new Secondary. Example: if Ellen Ripley is Primary and Jules Winnfield is Secondary, the next rotation makes Jules the Primary, moves Ellen to the bottom of the standby queue, and promotes the first standby user to Secondary. |
Edit or Delete a Shift
Relevant for App Admins and Group Managers
- On the Schedule tab, click the shift's name (in list view) or the shift block (in calendar view). The shift edit page opens with all fields pre-filled.
- To edit — change the fields you need, then click Submit to save.
- To delete — click Delete on the shift edit page, then confirm in the prompt. The group calendar updates immediately.
Remove a User from a Shift
- Open the shift (click its name on the Schedule tab list).
- In the editor, scroll to Members in Shift.
- Tick the user you want to remove.
- Click the ← arrow to move them back to Available Users.
- Click Submit.
How Notifications Are Ordered
When an alert routes to a group and a shift is active, AlertOps pages members in the order defined by the shift:
- Primaries first — from the top of the list down.
- Secondaries next — only if no Primary acknowledges within the escalation policy's wait window.
- Rotating members (on Rotating shifts) are standby only — they are never paged on the current cycle.
- Manager — group-level final escalation; paged after Primary and Secondary tiers exhaust.
Best Practices
Do
- Keep shift names descriptive — include the group, the coverage pattern, and the time zone if the team spans zones ("Payments — APAC Weekday Business Hours").
- For Rotating shifts, set a Start and End date six months to a year out so you have regular checkpoints to review the rotation and adjust for team changes.
- Use contrasting colours on overlapping shifts — calendar readability drops fast when two shifts share the same hue.
- Put your most-experienced responder as Primary at the start of the rotation so the first cycle is smooth.
- When you remove someone from the group, check their shift assignments first.
Don't
- Don't leave every shift on the default Time Zone. Match the shift's zone to where coverage actually sits.
- Don't mix too many roles into one shift. Use multiple shifts for different time windows rather than overloading one.
- Don't rely on Rotating without specifying a Rotation Frequency — the rotation will never advance.