
Purpose
Users are the people in your AlertOps account who can receive and respond to alerts. This article covers the full user lifecycle: adding users, editing their profiles (contact methods, roles, group membership, schedules, out-of-office), and removing them when they leave the team.
Audience
Relevant for Admins (App Admin or Owner)
All user-management actions except "view your own Profile" are Admin-only. Non-Admin users can configure their own Profile from the top-right Profile menu — see the User Profile article for that flow.
What Is a User?
A user is a member of your AlertOps account. Users can receive alerts through configured contact methods and acknowledge or resolve them from email, SMS, the web app, or the mobile app. Once you have more than a handful of users, organise them into groups and attach on-call schedules and escalation policies to those groups — see Basic Concepts for the model.
Add a User
Relevant for Admins
- From the top navigation, click Configuration → Users.
- Click + Add User in the top-right of the Users page.
- Enter the user's Email. If you want a different username, clear the "Use Email as User Name" checkbox and enter one.
- Enter the user's First Name and Last Name.
- Set the User Type (defaults to Standard User). See User Types Overview for what each type unlocks.
- Set the User Role. The full set in the dropdown is: App Admin, Basic, Billing Admin, Integrations Admin, Send Message, System Viewer. See User Roles for what each one grants.
- Click SUBMIT to save, or ADD ANOTHER to save this user and keep the form open for the next one. CANCEL discards the entry. If any required field is missing, the form surfaces inline "X is required" errors in red instead of submitting.
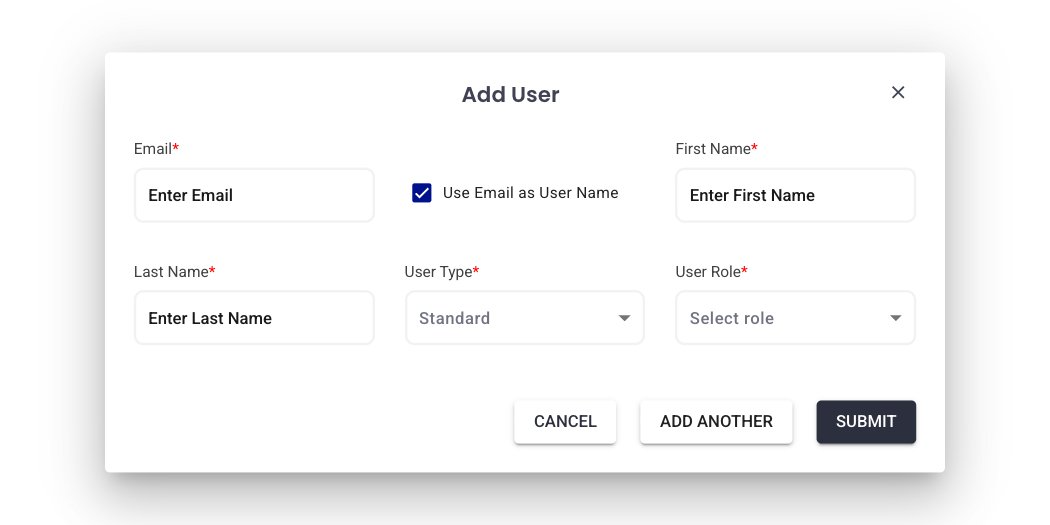
Figure 1. Add User modal — Email is required; "Use Email as User Name" auto-populates the username; User Type sits above User Role.
|
What the new user gets After you submit, AlertOps sends a password-reset email to the address you entered. The user clicks the link in that email to set their own password — admins never see or set the password themselves. |
Constraints. Every user must have a unique username (typically the email address) and a valid email address. User Type cannot be changed after creation — to change it, delete and recreate the user. See the FAQ.
Open a User's Profile
Relevant for Admins
The User Profile is the single page for everything attached to a user: identity fields, preferences, contact methods, out-of-office, integrations, roles, and schedules. The layout is the same as your own My Profile page — see User Profile for the full section-by-section walkthrough.
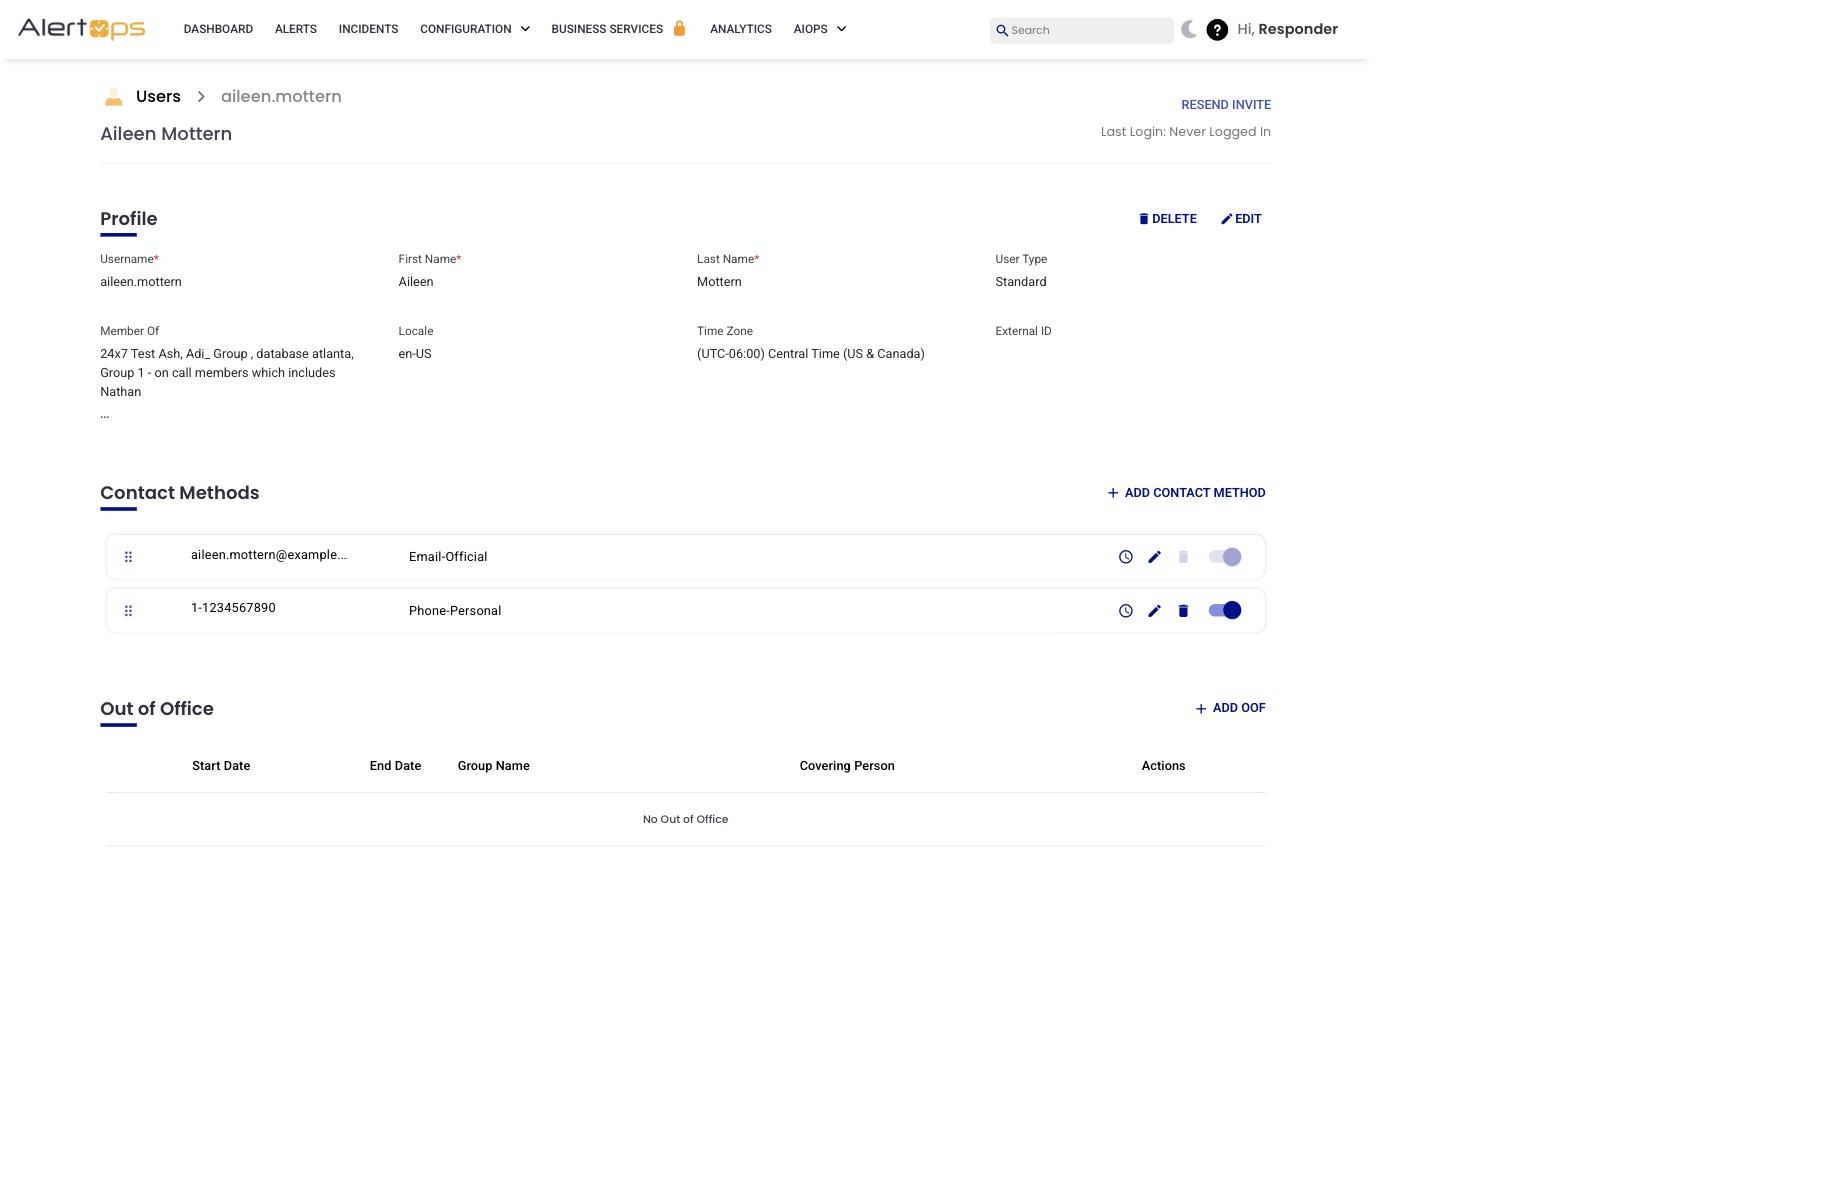
Figure 2. A user's edit page — Profile section at top with EDIT and DELETE buttons; Contact Methods section below with drag handles (⋮⋮) on every row.
- Go to Configuration → Users.
- Click the row of the user you want to open. AlertOps opens their profile at /users/edit/<id>.
- To edit any section (Profile, Preferences, On Call Reminder, Contact Methods, Out of Office, Integrations, Roles, Schedules), click Edit at the top-right of that card.
Group Membership
The Profile section on each user's page shows every group the user belongs to as a simple comma-separated list in a "Member Of" field (e.g., "24x7 Test Ash, A and B 21 days, change management, database atlanta, ..."). This is a flat listing — the user's group-member role (Primary, Secondary, or Manager) within each group is not shown on the Profile directly.
|
Where to see Primary/Secondary/Manager for a user To see the user's group-member role inside a given group, open the group itself: Configuration → Groups and Schedules → select the group → Members tab. Each member row has Primary / Secondary / Manager checkboxes. Don't confuse group-member roles (Primary / Secondary / Manager — where the user sits in a single group's escalation order) with platform roles (App Admin, Basic, etc. — what the user can do across the whole account). |
Change a User's Platform Role
Relevant for App Admins
The Roles section on a user's profile is a table with two columns — Role Name and Actions — listing every role currently assigned to the user. Use the section's controls to add or remove roles; a user can hold multiple roles.
- From Configuration → Users, open the user's profile.
- Scroll to the Roles section.
- Use the section's add / edit controls to assign a new role, or the Actions column to remove an existing assignment.
- Click SUBMIT or the green check-mark (✓) to save.
Role assignments can also be made in bulk via Configuration → Administration → Roles → select role → Assign User. See User Roles.
Contact Methods
Relevant for Admins (for other users) or the user themselves
Contact methods are how AlertOps reaches a user. Each method combines a channel (Email, SMS, Phone) with a label that tags what it is — Official vs. Personal — and in some cases a variant such as SMS Gateway. The full set available in the Select Contact Method dropdown is:
- Email-Official-SMS Gateway
- Email-Personal
- Email-Personal-SMS Gateway
- Phone-Official-Mobile
- Phone-Personal
- Phone-Personal-Mobile
- SMS-Personal
Push notifications are not in this dropdown — a Push contact method is added automatically the first time a user signs in to the AlertOps mobile app.
- Open the user's profile and scroll to Contact Methods.
- Click + Add Contact Method in the top-right of the card.
- Choose the method from the Select Contact Method dropdown. Methods the user already has are automatically filtered out — you cannot add a duplicate of any method.
- Enter the contact value (phone number, email, etc.).
- Optional: set the wait time and retry count.
- Click the green check-mark (✓) to save.
|
Sequence and mobile-app push Each contact method row has a drag handle (⋮⋮) on the left. Drag rows up and down to set the order AlertOps uses when an escalation policy is set to User Preference for its notification type. Escalation policies set to Centralized ignore this sequence and use the policy's own channel list. Push-notification contact methods are added automatically the first time a user signs in to the AlertOps mobile app — admins do not add them manually, and Push is not present in the Select Contact Method dropdown. |
Schedules and Out of Office
The Schedules and Out of Office sections on a user's profile show the user's on-call calendar and any coverage they have set up. For the full configuration and export flow (including WebCal and iCal export of personal schedules), see User Profile and Out-of-Office Coverage.
Remove a User
Relevant for Admins
There are two paths to delete a user:
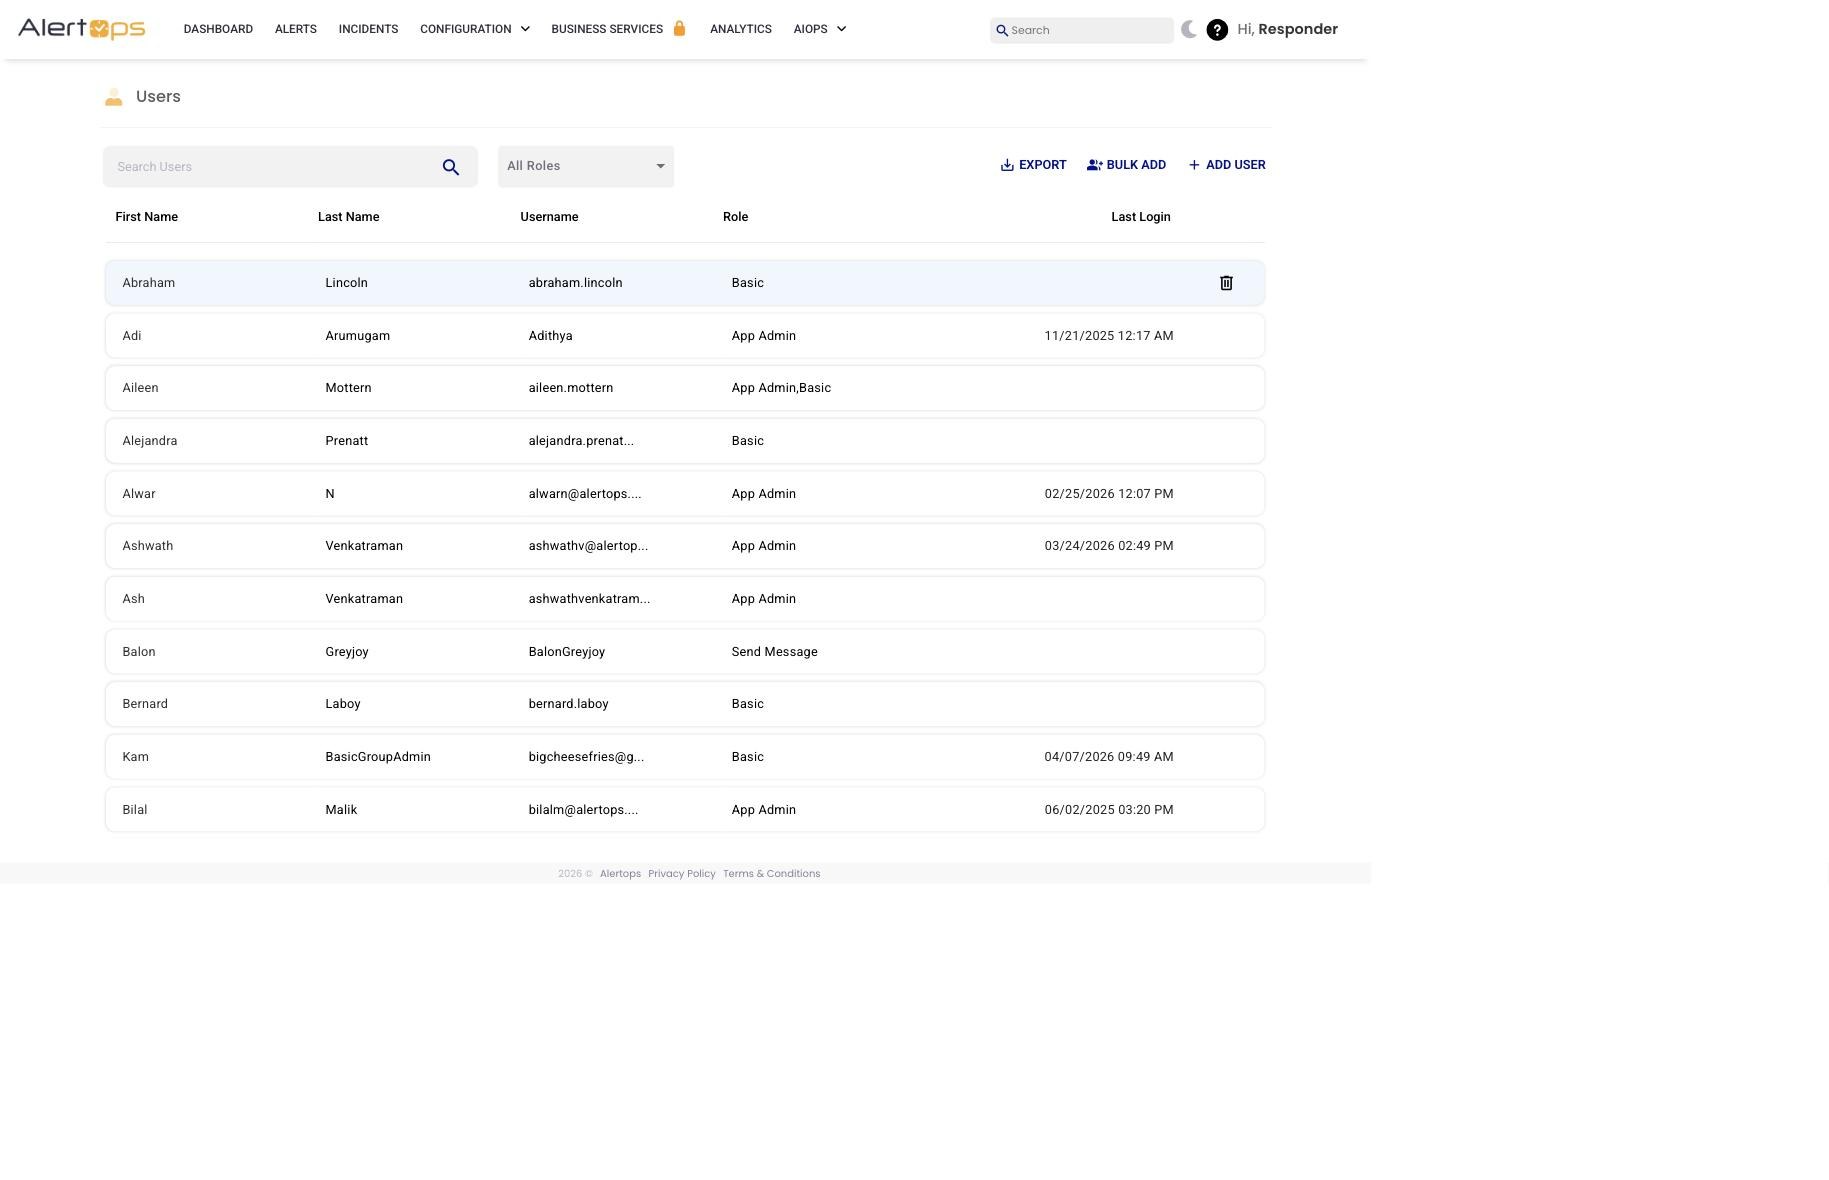
Figure 3. Configuration → Users — the trash icon only appears when you hover over a row. There is no visible "Action" column header.
From the Users list (quickest)
- Go to Configuration → Users.
- Find the user's row and hover over it. A trash icon appears at the far right of the row — there is no static "Action" column header, so the icon only becomes visible on hover.
- Click the trash icon. A Delete User? confirmation dialog appears with Cancel and Delete buttons.
- Click Delete to confirm.
From the user's Profile
- Open the user's profile.
- On the Profile section, click the DELETE button (next to Edit).
- Confirm.
|
You cannot delete a user who is on a shift If the trash icon appears greyed-out on hover, or the DELETE button on the Profile is disabled, the user is assigned to at least one shift. Remove them from every shift they are on (Groups and Schedules → each relevant group → Schedule tab → edit the shift → remove the user) before deleting. |
Change or Remove the Account Owner
Relevant for Owner and AlertOps support
Every AlertOps account must have exactly one Owner. The Owner cannot be removed or transferred from inside the product. To change the Owner, the current Owner must email support@alertops.com from the address on file with the new Owner's details.